Where to place outdoor path lights for maximum safety and style

Location: Roslyn, NY.
There’s nothing quite like a well-lit path leading up to your home – it’s inviting, safe, and speaks volumes about your attention to detail. But here’s the thing: simply scattering lights along a walkway won’t cut it. To get that perfect blend of safety and curb appeal, outdoor path lights need to be placed with purpose.
Whether you're lighting a front walkway, a garden trail, or the steps down to your patio, this guide will show you exactly where to place pathway lights, and why it matters more than most homeowners think. We’ll also explain why low voltage outdoor path lights are the smart, safe, and stylish way to get it done right.
Why placement matters for homeowners on Long Island, NY
Outdoor lighting isn’t just about showing off your landscape design; it plays a huge role in keeping your home safe. When walkways are poorly lit (or over-lit), they can cause more harm than good.
Properly placed outdoor path lights do three things:
Prevent trips, slips, and falls by highlighting steps, edges, and elevation changes.
Guide guests safely from the street or driveway to your door.
Create a soft, warm ambiance that adds character to your home at night.
On the flip side, placing lights too close together creates a harsh “airport runway” effect. Too far apart? You’ll have dark gaps that defeat the purpose. The key is intentional placement based on your property’s layout and how the space is used.
Ideal places to install outdoor path lights
To maximize both safety and style, you want to think beyond just lighting the main walkway. Here’s where pathway lights shine brightest on any property:
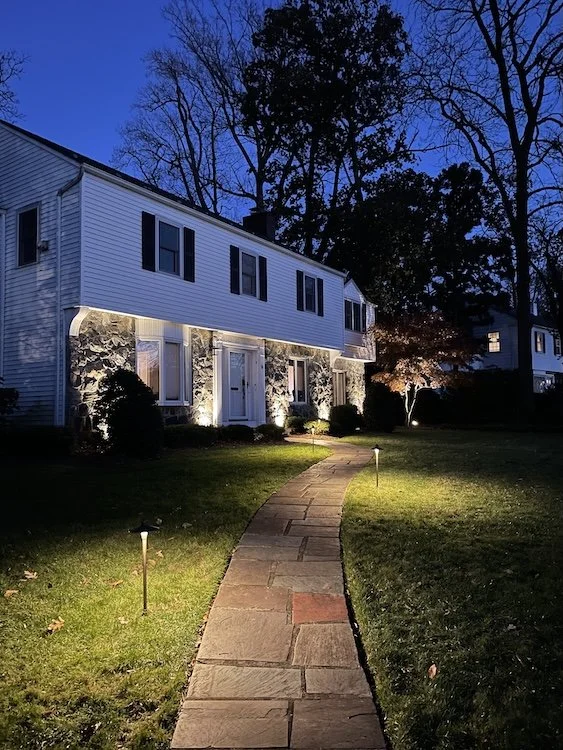
1. Front yard walkways
Location: Great Neck, NY.
This is where your lighting plan starts. These paths see the most foot traffic – guests, deliveries, family members – and they set the tone for your home’s exterior.
Use evenly spaced path lights to lead visitors to your front door.
Stagger the lights on each side of the path to avoid harsh symmetry.
Choose warm-toned low voltage lights to create a welcoming feel.
2. Driveways

Location: Great Neck, NY.
Driveways are often neglected when it comes to landscape lighting, but adding path lights here makes a big impact.
Helps drivers safely navigate, especially in narrow or curved driveways.
Adds curb appeal at night by outlining the space without overpowering it.
Use slightly taller low voltage outdoor path lights for visibility.
3. Backyard paths

Location: Dix Hills, NY.
These can lead to a fire pit, pool, detached garage, or garden shed. These paths often don’t have overhead lighting, so well-placed fixtures are key.
Use lower brightness fixtures to avoid glare.
Spacing can be wider in less trafficked areas.
Create a relaxed vibe with softer light color temperatures.
4. Garden trails

Location: Dix Hills, NY.
A winding garden trail looks magical at night with the right lighting.
Blend path lights into surrounding foliage or mulch.
Highlight interesting landscaping features or transitions.
Use fixtures that cast soft, low-spread beams for subtle elegance.
5. Flower beds
Adding path lights around flower beds helps define the space without overwhelming your garden.
Use standard height path lights (14–18 inches) to ensure proper illumination and avoid shadows that could hide plants.
Accent plants and textures with warm, directional lighting.
Avoid placing lights too close to plants that will grow and block them.
6. Steps, slopes & changes in elevation
Anywhere the ground isn’t flat is a lighting priority.
Combine pathway lights with step lighting for visibility from above and below.
Illuminate edges clearly without pointing lights directly into eyes.
Use lighting to reduce shadows that can confuse depth perception.
7. Around outdoor living spaces

Location: Lake Success, NY.
Your patio, deck, or fire pit area deserves thoughtful lighting that guides movement without overwhelming the atmosphere.
Outline the perimeter with low-glow low voltage path lights.
Use them to subtly lead people from one zone to the next.
Coordinate fixture finishes with other outdoor hardware for a cohesive look.
Spacing & height guidelines for outdoor path lights
You don’t need to flood your yard with lights to make it look amazing — you just need the right number, placed smartly.
General path light spacing rule:
Space path lights about 6 to 8 feet apart for consistent lighting without overlap.
If the lights have a wide beam spread, you can go slightly wider.
For narrower beams, keep the spacing tighter to avoid dark spots.
Path light height:
The standard height range is 14 to 18 inches above ground — this provides enough light for walkways without blinding anyone.
But some homeowners prefer shorter fixtures (under 12 inches) for aesthetic reasons. These are great for flower beds, modern landscaping, or areas where you want to keep the light source subtle.
The key is choosing a height that balances visibility and design.
Style tips: How to make the outdoor path lights look professional

Location: Syosset, NY.
Proper placement is just one part of the puzzle — the way your lights look and feel matters too. Here’s how to level up the design:
Keep things consistent — mix styles carefully and stick to one finish or color tone.
Hide the bulb, show the glow — opt for fixtures that direct light downward and reduce glare.
Don’t light everything — focus on rhythm and focal points instead of uniform lighting.
Coordinate with landscaping — blend fixtures into mulch, stone borders, or flower beds.
A professional look is less about fancy fixtures and more about thoughtful layout.
For a deeper dive on how to plan your outdoor lighting layout, check out our blog post, “How to design landscape lighting.”
Why low voltage outdoor path lights are best
When it comes to lighting your property, low voltage outdoor path lights are hands-down one of the smartest investments you can make. For starters, they’re much safer than high-voltage options, the typical 12-volt system is ideal for homes with kids, pets, or water features nearby. You won’t have to worry about exposed wiring or dangerous shocks.
They’re also far more energy-efficient than traditional 120-volt systems, especially when paired with LED bulbs. That means lower utility bills and a greener footprint. On top of that, quality low voltage fixtures are built to last. Unlike solar lights, which often need to be replaced after a season or two, these systems are designed for longevity.
Another big advantage? They’re compatible with smart controls. You can easily connect them to timers or manage them through your home automation system, giving you total control over your lighting without lifting a finger.

Location: Dix Hills, NY.
And most importantly, low voltage lights offer consistent, reliable brightness. No flickering. No dimming on cloudy days. Just clean, dependable light exactly where you need it.
Bottom line: low voltage means less maintenance, better performance, and lighting you can count on night after night.
Check out our post “Does landscape lighting use a lot of electricity?” to learn how much electricity modern lighting systems really use and how energy-efficient options like LED fixtures can keep your outdoor space beautifully lit without driving up your electric bill.
Common mistakes to avoid
If you’re going to install outdoor path lights, avoid these all-too-common mistakes:
Too many lights: Looks harsh and busy. Less is often more.
Uneven spacing: Creates patchy lighting and feels unintentional.
Inconsistent color temperatures: Mix of warm and cool lighting looks messy.
Relying on solar: Inconsistent brightness and short lifespan make them unreliable for primary lighting.
Final thoughts
Path lights aren’t just about seeing where you’re going, they’re about how your home feels after the sun goes down. The quiet glow along a walkway, the subtle highlight on a curve in your garden, the soft light marking each step – all of it creates a mood. A sense of care. A feeling of home.
But it only works when the lighting is thoughtful. Not too many, not too few, not placed just because. When you light with intention, you’re not just adding fixtures; you’re shaping how people experience your space.
So whether you’re trying to make your front walk safer, add some charm to your garden, or finally stop tripping over that one step in the backyard, the right lighting plan makes a difference.
If you’re staring at your yard wondering where to even start, that’s what we’re here for. We don’t do cookie-cutter layouts. We walk the space, listen to how you use it, and design a plan that actually fits your home. We offer professional design and installation services on Long Island, NY (Nassau County and Suffolk County), and the surrounding areas. Contact us today, and we’ll connect you with one of our expert lighting designers to discuss your needs and provide a custom design proposal for your home.